Eliminate Wi-Fi deadspots using Powerline technology
Blogroll, Cool Stuff, Tech Toys Add comments
 For those with wireless networks in their homes, it can get frustrating at times when your wireless router signals do not reach to all areas of your home. This leads to very slow or non-existent internet connections. Ideally, there should be a strong Wi-Fi signal wherever you are in your home.
Unfortunately, the different obstructions in a typical house (i.e. walls, furniture, cabinets, etc.) can degrade a signal so much that there is virtually a little or no signal the farther you are away from your wireless router.
In this blog entry, I will give the details on one solution that I’ve used to extend my wireless network throughout my house, so that I have strong Wi-Fi signal no matter what distance I am from my wireless router. In my existing home network, my main wireless router is a NETGEAR RangeMax Dual-Band Wireless-N Router with 4-Port Gigabit Ethernet Switch (WNR3700).
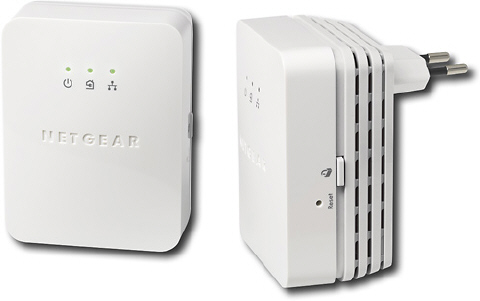
The technology I will use is Powerline technology. This is a relative new networking technology that is gaining consumer acceptance. Rather than hard wiring your home with new Ethernet cabling, the less costly method is to use the existing electrical wiring in your home to transfer data at very high speeds. In order to accomplish this, you need to plug in special adapters that insert into any standard electrical outlet.
Here’s what I bought:
NETGEAR Powerline AV 200 Adapter Kit (XAVB2001)
NETGEAR Wireless N Router (WNR2000)
Here’s a summary of the procedure:
- Install Powerline adapters.
- On the main wireless router (WNR3700) specify a range of IP addresses for the LAN & WLAN clients.
- Convert the NETGEAR WNR2000 wireless router into an access point.
- Connect a computer or laptop to the wireless access point.
- Voila! You will have a strong Wi-Fi signal, in all the far distances from your main wireless router.
Here’s a more detailed procedure:
(1) Installing the Powerline adapters is as easy as Plug-n-Play — they will work right out of the box, with no setup required. One adapter should be plugged into an outlet nearest the main wireless router and another in an outlet at the farthest corner of the house — where you want to setup your access point. Keep in mind, one of the drawbacks of Powerline technology is that you must make sure you connect to an outlet that allows for the clearest/uninterrupted electrical signal. When a typical house is built, the electrical wires may go into different boxes and switches, which may degrade the electrical signal. Once the Powerline adapters are installed, verify internet connectivity by plugging in an Ethernet cable into the furthest Powerline adapter and the other end into your laptop. If there is a connection, proceed to the next step.
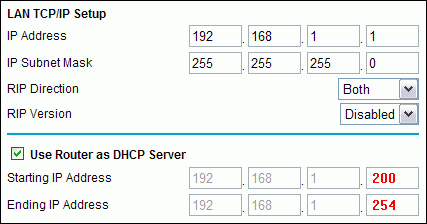
(2) On the main wireless router, identify its IP address and login to the wireless router admin page. Typically, the router IP address is 192.168.1.1. On NETGEAR routers, you can also type www.routerlogin.net to get to the admin page. While you are on the main wireless router admin page, set the DHCP range that all clients will be assigned an IP address. IMPORTANT: Leave a range of IP numbers that is out of this range, which will be reserved for the access point.

In the example above, the main wireless router IP is 192.168.1.1. The DHCP range is 192.168.1.200-254. Therefore, I can make the access point IP any address between 192.168.1.2 to 192.168.1.199.
Another setting to change on the main wireless router is the wireless channel used. Rather than having the router auto-select a wireless channel, manually choose one. In my case, I chose Channel 5 for my main wireless router. For my access point, I will choose a different channel, to avoid conflict and interference.
Be sure to save/apply all the changes above. When the page is done refreshing, make sure all the changes are as described above.
(3) In order to set the access point settings, make sure you use a laptop/computer that is NOT connected to the internet through the main router. Disable the wireless internet connection on this laptop, if necessary. NOTE: It is preferred to use a laptop, since you’ll eventually take this laptop next to the farthest Powerline adapter.
(4) Now connect this laptop to the other wireless router that you want to convert to an access point. Be sure to plug an Ethernet cable from the Ethernet port of your laptop/computer to a LAN port of the access point. Do NOT plug it into the Internet port. See below.

(5) As you did with the main wireless router, type in the default router IP address in a browser to access the admin page of the access point.
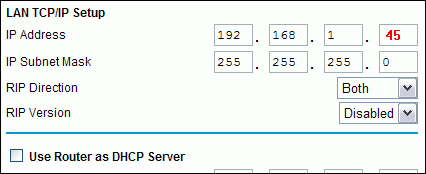
The first setting you need to change is the default IP address of the access point. As I mentioned in #2 above, the access point IP address needs to be outside the DHCP assigned IP range of the main router.

In the pic above, you can see that I’ve set my access point IP to 192.168.1.45. Save/apply your changes. Once the page refreshes, very the new IP address of the access point. At this point, access to your admin page may stop responding, due to this IP address change. You may even get a warning that you have to re-login to access the admin page.
(6) With the access point still connected to your laptop/computer, plug in another Ethernet cable into the Powerline adapter port (the one furthest away from your main wireless router). Plug the other end of this Ethernet cable into another LAN port of the access point. Type in the IP address that you assigned in #5, and now you should be able to re-connect to the admin page of the access point.
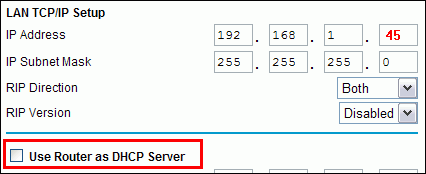
(7) Once you are able to get to the access point’s admin page, you need to disable the access point’s DHCP function. Basically, you only need the main router to have the functioning DHCP. If you have two DHCPs on the same network, there will be IP conflicts, which will cause your network to stop functioning.

In the pic above, notice that I’ve “unchecked” the option to use the access point as DHCP Server.
The last setting to change on the access point is the wireless channel. As we did for the main wireless router, set an actual channel number on the access point rather than using the auto-select option. In my case, I chose Channel 10 for my access point.
(8) Finally, disconnect the Ethernet cable from your laptop. Enable the wireless connection and select the access point’s Wi-Fi connection. If the Powerline connection is optimum, then you should have as fast a connection to the internet as if you were right next to the main wireless router.
Leave a Reply
You must be logged in to post a comment.

Recent Comments